

Fun Times: Engagement in the Virtual Classroom
Ginny Maglio and I just completed our third round of EnVisioning Virtually: Creating Engaging Courses in the Virtual Environment this month. During the five-session Zoom series we share tons of tips, guide the participants during demo activities as they try out new approaches, and get to try out some different techniques ourselves.
This past year, we’ve observed that virtual participants consistently love using the annotate tool. In case you haven’t had the pleasure of using it yet, this tool allows you to annotate on a whiteboard or any shared screen by typing text, drawing lines, and placing “stamps” such as stars, arrows, or hearts.
In our final session, we prepared two pages of ideas for engaging virtual learners. Below are a few of our favorite activities that feature the annotate tool.
- Map Ice Breaker
Display a map covering the geography of your learners. Instruct learners to place a stamp near where they are participating from. This is a nice way to get started in a course and is a great activity for introducing use of the annotation tool. - Getting to Know Your Learners
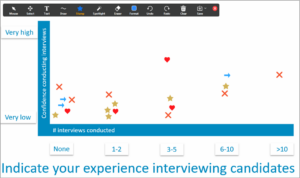
Display an image, such as a continuum or a graph, with labels. Post a question and instruct learners to use the stamp tool to mark the location on the image that best aligns with their views or feelings related to the question. For example, for the question, “How many times have you interviewed people for an open position?” create a horizontal bar on the slide and label one end “Never” and the other end “More than 10.” Even better, label a few points in between “1-2,” “3-5,” “6-10,” and “>10.” (For very large groups, consider using polling functionality instead.) - Matching
Prepare a slide with a list of words on the left and associations on the right. For example, list new terms on the left and related definitions on the right. Ask learners to draw a line from the term to its definition using the draw tool. Then you can review the responses, reinforcing what is correct and discussing what is incorrect. Depending on the number of learners, you might assign each person or pair one term. You can do something similar with an image (a piece of machinery) on the left and labels related to parts of the image on the right. (Best for smaller groups.) - Brainstorm
Post a brainstorm prompt on a whiteboard or otherwise blank slide. Instruct learners to use the text tool to write their response. As the host, you can select and move the responses around, allowing you to ensure people don’t write over each other. You can even group responses into affinity groups and create a new text box to label the group, then use the draw tool to circle each affinity group. Don’t forget to save the annotated image before clearing it! - Voting
As an alternative to using the poll functionality, prepare a slide with items—words or phrases—you wish the learners to vote on. Instruct them to use the stamp tool to indicate their vote(s). To mix things up a bit, have them “heart” the item they like the most and “X” the item they like the least. For example, post the question “Place a star next to the item with highest pH, and an arrow next to the item with the lowest pH” and show images of lemons, coffee, bleach, and milk. You will quickly see what your learners already think, believe, or know. - Recap Round Robin
Display a slide with the learner’s names or headshots with space next to each. Ask them to use annotation to write one thing they took away from the class, one thing that surprised them, or one new thing they are going to try in the next week. Summarize responses, then save the slide and share it with learners after the class. Optionally, display the completed image at the start of the following session.
Try out something new to enliven your learning! We’d love to hear from you – if you have an activity that works really well for you, please email us and we will highlight you and your activity in our next post.